I LOVE PANCAKE DAY! They are an evening thing for us, so we are not quite there, but we are getting ready...
Here's the perfect recipe:
8oz plain flour
2 eggs
1 pint milk
pinch salt.
Once you've weighed out the flour, dry whisk it a few times with a balloon whisk. Make a well in the centre and break the eggs into it. Pour in the milk and then carefully whisk with the balloon whisk, drawing more flour into the well gradually.
Leave it to settle for half an hour or so and then go for it.
My favourite is banana-mars bar-chocolate spread. But of course the first one is always lemon and sugar: sugar on first and then soaked with lemon juice. ~Yum.
Showing posts with label occasions. Show all posts
Tuesday, February 12, 2013
In the Night Garden Cake
Yes, another novelty cake. I'm on a bit of a mission to show people that it isn't that hard to make a cake that's impressive looking! Although if anyone's got any tips of photographing cakes I'd love to hear them as I just don't seem to be able to get them to look good on film, as it were.
I'm going to take this opportunity to talk about the type of cake you have inside all that icing. For most of my novelty cakes I use a simple Madiera recipe because it is easy to carve, you can freeze it, and you can colour it. However I'm not a huge fan of how it tastes so whenever possible I try and use something else. My favourites are carrot cake and chocolate courgette cake, which I know sound rank when you think too much about it, but they are actually lovely.
For this cake I wanted something quite tall, as I wanted to decorate the sides. The problem with stacking up cakes is that if you go with a standard sponge recipe you end up trying to cut them to make them flatter or fit together better. So here I will give you a recipe for a chocolate cake that gives you a lovely tall, flat-topped cake with no carving. What could be better.
This recipe makes 3 cakes to stack on top of each other, and comes from the Practical Encyclopedia of Baking by Martha Day which I highly recommend. I've had it for years and it has some excellent fail-safe recipes in and lots of pictures.
----------------------------------------------------------------------------------------------
Best-Ever Chocolate Sandwich
4oz unsalted butter
4oz plain flour
2 oz cocoa powder
1tsp baking powder
pinch salt
6 eggs
8oz caster sugar
2tsp vanilla extract
Preheat the oven to Gas /350degF/180degC. Line the base of three 20cm sandwich tins with greaseproof paper, grease and dust with flour.
Melt the butter.
Sift the flour, cocoa and baking powder together three times.
Place the eggs and sugar in a large heatproof bowl and set over a pan of hot water. Use an electric mixer to beat until the mixture doubles in volume and is thick enough to leave a ribbon train when you lift the beaters out. It takes about 10-12 minutes. Then whisk in the vanilla.
Sift in the dry ingredients in three batches, folding carefully in.
Fold in the melted butter.
Divide the mixture evenly between the tins. If you find it hard to judge this, use a cocktail stick to measure how thick each one is and adjust accordingly.
Bake until the sides of the cake pull away from the sides of the tin. About 25 minutes.
Turn them out as soon as you can onto a rack.
----------------------------------------------------------------------------------------------
I've mentioned before how much I hate regal icing. The fact is it's really easy to make 3D models of things with it though, and for some reason the kids will gobble it up, so for now I use butter icing as much as possible and regal icing as little as possible. I this case I used chocolate butter icing for in-between the sandwiches and maple syrup butter icing for the outside (coloured green). Maple syrup butter icing is SO GOOD on carrot cake, by the way.
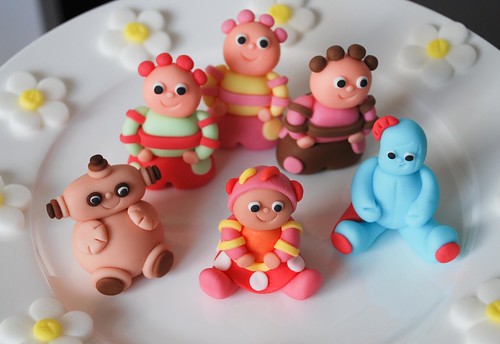
If you are making characters or 3D things to go on top of a cake it's best to do them in advance and let them sit around for a few days to harden up. Otherwise they will sag and get fatter and fatter. If you are sticking them on top of a cake I advise using a cocktail stick to keep them secure. So these In the Night Garden characters were copied from here. You can see they are caricatures of the originals and instantly recognisable but much easier to model. It's just play-dough people. I used Wilton colours again, as they are the best in my opinion. In each case make the tummy, then the legs, then the head and finally the arms. Stick all the bits together using a paintbrush and water. They need to harden up lying down for a couple of days.


The flowers on the outside were made using regal icing and these cutters from Lakeland. I really like these type of cutters and they have a spring mechanism to push the cutting out.
Finally, I've piped some flowers on in yellow butter icing. This masks the bottom of the cake where it joins the board. I also went a bit mad on the top of the cake because I like piping. It's fun!
...and that's the whole point really. Making these things is good fun. Don't let yourself get stressed out by it, just try and enjoy it. I made the figures while watching TV during the week before, and put the cake together in a couple of hours the night before the party. Go on, have a go and enjoy it!
I'm going to take this opportunity to talk about the type of cake you have inside all that icing. For most of my novelty cakes I use a simple Madiera recipe because it is easy to carve, you can freeze it, and you can colour it. However I'm not a huge fan of how it tastes so whenever possible I try and use something else. My favourites are carrot cake and chocolate courgette cake, which I know sound rank when you think too much about it, but they are actually lovely.
For this cake I wanted something quite tall, as I wanted to decorate the sides. The problem with stacking up cakes is that if you go with a standard sponge recipe you end up trying to cut them to make them flatter or fit together better. So here I will give you a recipe for a chocolate cake that gives you a lovely tall, flat-topped cake with no carving. What could be better.
This recipe makes 3 cakes to stack on top of each other, and comes from the Practical Encyclopedia of Baking by Martha Day which I highly recommend. I've had it for years and it has some excellent fail-safe recipes in and lots of pictures.
----------------------------------------------------------------------------------------------
Best-Ever Chocolate Sandwich
4oz unsalted butter
4oz plain flour
2 oz cocoa powder
1tsp baking powder
pinch salt
6 eggs
8oz caster sugar
2tsp vanilla extract
Preheat the oven to Gas /350degF/180degC. Line the base of three 20cm sandwich tins with greaseproof paper, grease and dust with flour.
Melt the butter.
Sift the flour, cocoa and baking powder together three times.
Place the eggs and sugar in a large heatproof bowl and set over a pan of hot water. Use an electric mixer to beat until the mixture doubles in volume and is thick enough to leave a ribbon train when you lift the beaters out. It takes about 10-12 minutes. Then whisk in the vanilla.
Sift in the dry ingredients in three batches, folding carefully in.
Fold in the melted butter.
Divide the mixture evenly between the tins. If you find it hard to judge this, use a cocktail stick to measure how thick each one is and adjust accordingly.
Bake until the sides of the cake pull away from the sides of the tin. About 25 minutes.
Turn them out as soon as you can onto a rack.
----------------------------------------------------------------------------------------------
I've mentioned before how much I hate regal icing. The fact is it's really easy to make 3D models of things with it though, and for some reason the kids will gobble it up, so for now I use butter icing as much as possible and regal icing as little as possible. I this case I used chocolate butter icing for in-between the sandwiches and maple syrup butter icing for the outside (coloured green). Maple syrup butter icing is SO GOOD on carrot cake, by the way.
If you are making characters or 3D things to go on top of a cake it's best to do them in advance and let them sit around for a few days to harden up. Otherwise they will sag and get fatter and fatter. If you are sticking them on top of a cake I advise using a cocktail stick to keep them secure. So these In the Night Garden characters were copied from here. You can see they are caricatures of the originals and instantly recognisable but much easier to model. It's just play-dough people. I used Wilton colours again, as they are the best in my opinion. In each case make the tummy, then the legs, then the head and finally the arms. Stick all the bits together using a paintbrush and water. They need to harden up lying down for a couple of days.


The flowers on the outside were made using regal icing and these cutters from Lakeland. I really like these type of cutters and they have a spring mechanism to push the cutting out.
Finally, I've piped some flowers on in yellow butter icing. This masks the bottom of the cake where it joins the board. I also went a bit mad on the top of the cake because I like piping. It's fun!
...and that's the whole point really. Making these things is good fun. Don't let yourself get stressed out by it, just try and enjoy it. I made the figures while watching TV during the week before, and put the cake together in a couple of hours the night before the party. Go on, have a go and enjoy it!
Labels:
birthdays,
cakes,
In the Night Garden,
occasions,
recipes
Saturday, February 02, 2013
Novelty Birthday Cakes
I know that buying birthday cakes is lot less work, and that you can get some lovely ones in the supermarkets now, but the fact is I like making them. I relish the challenge and it's a creative outlet. Moon's birthday is next week so I'll be blogging again soon about her cake, but the Bean has just had her birthday so I thought I'd do a little post about hers.
I've written before about my adventures in cake making: Peppa Pig, Pingu, cupcakes, and a Dinosaur. Since she loved her 2nd birthday dinosaur so much, the Bug asked for another one for her third birthday. Well that's easy! Pushed the boat out a little more on that one, and went for diplodocus rather than triceratops, and made it her favourite colour.
These cakes are easy, people. There's a tutorial for the dinosaurs in the link above.
The Bean last year requested a butterfly and flower cake and asked that it be pink and purple. Well the butterfly was pretty easy, just a sandwich cake cut in half with cupcakes down the middle.
And yes, it's pink and purple the whole way through. How to do that? Split the cake mix in two and colour it, then put dollops of each in the tin.
The flowers were so popular I only got time to take this rubbish photo before they were gobbled. Yes they are cake pops with regal ice petals. I made them buy 'threading' the petals onto the dried cakepop while it was upside-down and letting them set before turning them the right way up again. I wasn't too pleased with them to be honest, they were a bit too big and next time I'd do them smaller and take a bit more time.
As an aside I do like cakepops, but I don't like the new cakepop makers. They do defeat the point a bit. In a proper cakepop you have a mixture of cake and butter icing inside and that is what makes them so marvellous.
Now, those of you that know me, know that I'm not a big fan of pink. Or fairies. So when the Bean said she wanted a fairy cake for her birthday this year my heart sank. Still, I believe very strongly that the kids should have their own opinions and likes and dislikes, so a fairy cake it was to be. However there is room for a bit of sneaky influence when you are a Mum.
Yes, it is a fairy cake, but it's hardly pink at all! And she loved it. I'm quite pleased with this dumpy little fairy actually.
She's made totally out of shop-bought regal ice, and is holding a little butter icing flower. I made the dress using this fab little leaf cutter set from Lakeland. I did find the head a bit difficult though. I need more practice with that, but D did point out the first head was way to big and she looks infinitely better with this one.
You know what? This was one of the quickest novelty cakes I have done. It's just two hemisphere cakes on top of each other. I secured them together with a couple of BBQ wooden skewers just to be on the safe side and then iced her up. I like the little butter icing snails too. The little mushrooms are made from shop-bought snowflake cake toppers with a ball of icing underneath. Sainsbury's is still selling these of in packs of 16 or so for 20p after Christmas. They basically last forever, so worth getting a few, I'm sure they've got lots of uses.
I've written before about my adventures in cake making: Peppa Pig, Pingu, cupcakes, and a Dinosaur. Since she loved her 2nd birthday dinosaur so much, the Bug asked for another one for her third birthday. Well that's easy! Pushed the boat out a little more on that one, and went for diplodocus rather than triceratops, and made it her favourite colour.
These cakes are easy, people. There's a tutorial for the dinosaurs in the link above.
The Bean last year requested a butterfly and flower cake and asked that it be pink and purple. Well the butterfly was pretty easy, just a sandwich cake cut in half with cupcakes down the middle.
And yes, it's pink and purple the whole way through. How to do that? Split the cake mix in two and colour it, then put dollops of each in the tin.
The flowers were so popular I only got time to take this rubbish photo before they were gobbled. Yes they are cake pops with regal ice petals. I made them buy 'threading' the petals onto the dried cakepop while it was upside-down and letting them set before turning them the right way up again. I wasn't too pleased with them to be honest, they were a bit too big and next time I'd do them smaller and take a bit more time.
As an aside I do like cakepops, but I don't like the new cakepop makers. They do defeat the point a bit. In a proper cakepop you have a mixture of cake and butter icing inside and that is what makes them so marvellous.
Now, those of you that know me, know that I'm not a big fan of pink. Or fairies. So when the Bean said she wanted a fairy cake for her birthday this year my heart sank. Still, I believe very strongly that the kids should have their own opinions and likes and dislikes, so a fairy cake it was to be. However there is room for a bit of sneaky influence when you are a Mum.
Yes, it is a fairy cake, but it's hardly pink at all! And she loved it. I'm quite pleased with this dumpy little fairy actually.
She's made totally out of shop-bought regal ice, and is holding a little butter icing flower. I made the dress using this fab little leaf cutter set from Lakeland. I did find the head a bit difficult though. I need more practice with that, but D did point out the first head was way to big and she looks infinitely better with this one.
You know what? This was one of the quickest novelty cakes I have done. It's just two hemisphere cakes on top of each other. I secured them together with a couple of BBQ wooden skewers just to be on the safe side and then iced her up. I like the little butter icing snails too. The little mushrooms are made from shop-bought snowflake cake toppers with a ball of icing underneath. Sainsbury's is still selling these of in packs of 16 or so for 20p after Christmas. They basically last forever, so worth getting a few, I'm sure they've got lots of uses.
Tuesday, January 29, 2013
Eat This! - Lamingtons
I didn't make Lamingtons this year (which I usually do on Australia Day) but I did see that they have bit to UK mainstream by being included in the new Guardian Cook section that comes with Saturday's paper. I'm guessing every family has their own Lamington recipe, so just to wade in I'll give you ours. Oh my, I love these things. Mum used to make big piles of them for my birthday cake, and it seems the novelty of our family recipe is the use of a bit of lemon in the icing.
For the cake (you can use any sponge really, and it's great with slightly stale cake as it holds together better)
125g butter
3/4 cup caster sugar
2 eggs
2 cups self raising flour
1/2 cup milk
1 tsp vanilla
Cream butter and sugar and beat in the eggs. Fold in the flour alternately with the milk (+ vanilla)
THIS MIXTURE WILL BE VERY THICK, DON'T WORRY!!!!
Bake at 180 degrees for 30 - 40 minutes until a skewer inserted into the middle comes out clean.
When the cake is cold cut into chunks of whatever size you fancy.
For the icing:
3 table spoons boiling water
2 table spoons cocoa
30g butter
2 cup icing sugar
lemon juice to taste
Melt the butter and stir in the cocoa powder. Stir in the icing sugar and add boiling water as necessary. Keep the icing warm as it will solidify quickly when cold! Add lemon to taste.
NOW THE MESSY PART! Dip the cake into the icing and then roll in coconut. I always end up making more icing as it gets so messy and I end up using more than the recipe. The coconut coated icing will dry almost immediately, so do the dipping while the icing is still hot. I guarantee you will be coated in icing and coconut by the end of this.
Yum.
For the cake (you can use any sponge really, and it's great with slightly stale cake as it holds together better)
125g butter
3/4 cup caster sugar
2 eggs
2 cups self raising flour
1/2 cup milk
1 tsp vanilla
Cream butter and sugar and beat in the eggs. Fold in the flour alternately with the milk (+ vanilla)
THIS MIXTURE WILL BE VERY THICK, DON'T WORRY!!!!
Bake at 180 degrees for 30 - 40 minutes until a skewer inserted into the middle comes out clean.
When the cake is cold cut into chunks of whatever size you fancy.
For the icing:
3 table spoons boiling water
2 table spoons cocoa
30g butter
2 cup icing sugar
lemon juice to taste
Melt the butter and stir in the cocoa powder. Stir in the icing sugar and add boiling water as necessary. Keep the icing warm as it will solidify quickly when cold! Add lemon to taste.
NOW THE MESSY PART! Dip the cake into the icing and then roll in coconut. I always end up making more icing as it gets so messy and I end up using more than the recipe. The coconut coated icing will dry almost immediately, so do the dipping while the icing is still hot. I guarantee you will be coated in icing and coconut by the end of this.
Yum.
Subscribe to:
Posts (Atom)