Showing posts with label recipes. Show all posts

Sunday, February 01, 2015

Eat this: chocolate caramel pretzels


These are always a big hit wherever I take them, and they are so easy to make. The picture is of fancy Christmas pretzels which for some reason are cheaper than the ordinary ones, but any salted pretzel works well. All you need are pretzels and some chocolate caramels. I usually use Rolos or Galaxy Bites. The Galaxy Bites have the advantage of a higher caramel to chocolate ratio, and often they are cheaper by weight, but they do roll around if you aren't careful, so you need some balancing skills to get them on to the pretzels and into the oven. If you do a whole baking sheet of these (and I recommend you do) you're going to need about four rolls of Rolos.

Lay your pretzels on a lined baking sheet and put one chocolate caramel on top of each one. Put them into the oven for 3-5 mins at 180 degrees or until the caramels are soft. Press another pretzel on to the top of each caramel. You should have a sandwich of pure joy.

They can take a while to harden. As I'm usually preparing these about 15mins before I leave to go to book club, I put them into the freezer for 10 minutes. Once they are hard they slide off the baking paper no problem. 

Sunday, January 18, 2015

Lego Movie Cake

Oh my. I was quite unprepared by how popular my facebook post of this cake would be. Sadly I have to say it was one of the easier cakes I have done (or maybe I'm just getting used to the novelty cake thing now, with 3 a year to practise on). At first the Bean's request for a "Lego movie cake with an explosion and all the characters running away" seemed a little too hard, but thank God for Pinterest, I found this:


Which was pretty much exactly as requested! I decided pretty quickly that I wouldn't be making the characters out of icing, and apart from that it didn't look too bad. We'd bought the Bean a Lego set containing Emmet, WyldStyle and UniKitty for her birthday, which was helpfully a few days before the cake was required for the party, so that just left Benny, Batman and Vitruvius.  I cannot tell you how excited I was to find spaceman benny in D's old 80s Lego collection!


I managed to cobble together a Vitruvius, but it's best not to examine him too carefully!
If you followed my novelty cake posts before you'll have heard me say time and again how much I dislike shop-bought fondant icing. It costs a lot, and it tastes horrible. In the past I've just tried to overcome it with an unhealthily thick layer of flavoured buttercream underneath, but I decided this time to try something I've been meaning to make for some time: marshmallow fondant.

It turns out making fondant is not only cheap and easy, but it tastes vastly superior to the shop-bought stuff. I used this recipe, and as I was just trying it out, I decided to make a huge block and colour it later. I added in large slug of lemon juice too, as my girls are obsessed with lemon icing! Next time, I will certainly colour the marshmallow mixture prior to the addition of the icing sugar, as it is much easier to stir in a colour than knead it in at the end. As ever, I used Wilton paste colours; you just can't get a good red or black any other way. For the red and green, I needed to add a little oil to keep the texture right.

Instead of the lovely little white marshmallows, I used a standard supermarket home-brand bag of pink and whites. They are about half the price of the tiny ones, and as I was going to be colouring up the whole batch, I didn't think a little bit of pink would matter. You usually have a lot more white than pink in a pack in any case. As I don't have shortening in my pantry, I used vegetable oil, which worked fine.


I highly recommend double wrapping and then sealing in a box and leaving the fondant for a few days before using it. It's texture seems to become better with age. Do not let it dry out though! 

From there it was just a case of modelling. I like to get in a zone, with a cup of tea and an audiobook and relax into it. It's quite fun! The lego noddles on top of the cake I made by rolling out the grey really thin and cutting them out with a straw. The fondant sticks together with water just like regular fondant. And here's the finished article (as usual I forgot to take a nice photo before the day. There's always so much else to do!):


Thursday, June 20, 2013

Piping a Giant Rose

Oh my, when Bug said she wanted a giant flower cake with a bee on it my heart was happy because I had in mind just what I would do.  Something like this:


Which looked super impressive, but when it comes down to it, is quite simple.

However, when I showed her the picture (and it's always a good idea to check first with Bug, her needs and wants are VERY specific) she hated that and explained she wanted a giant flower with a bee on it.  OK I thought, I've seen tutorials online for piping a rose, I just need to do that with a really big nozzle.

Yes.  A really big one.

I had the bright idea that I could bake a hemispheric cake and use that as the base.  Then piping would be child's play, right?  Happily I could actually practise this one on the cake tin.  It didn't turn out too bad! One of my friends gave me the great tip of adding a spoonful of cream of tartar to the butter icing and this really helped give the tips a sharp edge and stiffened up the mixture enough to hold the shape. So when it came to the actual cake, I just did a crumb layer of icing and then went ahead.  The icing is coloured yellow, then I put a red stripe of icing inside the piping bag on the narrow side of the teardrop nozzle to give the petals a dark edge.


If I did it again, I would stop halfway and cool the icing down again before contiuing.  you can see where it all started to go pearshaped, but of course I was doing this the night before the party so didn't have time to be sensible.


I would post a recipe for the cake, but I won't because actually it was rank.  My first attempt at a lemon cake and it was horrible.  Luckily for me kids only want to eat the icing in any case.   I used butter icing with added cream of tartar and of course I added maple syrup as I always do!  The cake to icing ratio is rather outrageous in this case.  Don't look at the cake in this picture.  As I said, it was rank.


And the bee?  A good old cake pop.


There's a million tutorials out there for how to make cake pops so I won't add to the deluge. I used chocolate courgette cake for the filling and white chocolate coloured with yellow colouring for the coating.  I find it best to freeze the pops and coat them straight from the freezer in very small batches.  That way the chocolate hardens almost straight away and you can do another layer. However I will say that an upturned egg box weighted down with marbles makes a good holder for them.


Wednesday, February 27, 2013

Eat This! - Mayonnaise

I know, I don't either.  It's just that today I had a real craving for a tuna mayonnaise sandwich, and I didn't have any in the fridge.  Also I have two sick kids at the moment so couldn't just pick it up at the shop, as I CAN'T LEAVE THE HOUSE.  Well, except on the school run with the two sick ones quarantined under a raincover.
The point is, maybe some of you like a bit of homemade, and you like getting a sore arm, and you are really going to eat all this mayonnaise in 2 weeks (I'm not, what a waste)... here you are.


2 egg yolks
large dollop of English mustard
1tsp sugar
1tsp salt
splash of Worcester sauce
300ml oil
3tsp lemon juice or white vinegar or a mix of the two
1tsp hot water

whisk the egg yolks, mustard, sugar, salt, and Worcester sauce together in a bowl till smooth. Add 150ml oil SLOWLY (dribble it in) while whisking fast. Add half of the lemon juice and the hot water and whisk in.  Add the rest of the oil in larger splashes while whisking. Add the rest of the lemon juice. Season to taste and if you are me, add more mustard.  Cover and keep in the fridge.  Use within 2 weeks.

On the point of tuna, I must say it is one of those foods I find quite repulsive on a usual day. Sometimes, however, it is the only thing that will hit the spot.  Sardines are the same.  Is this a uniquely fish-related phenomenon?

Tuesday, February 12, 2013

Perfect Pancakes

I LOVE PANCAKE DAY!  They are an evening thing for us, so we are not quite there, but we are getting ready...


Here's the perfect recipe:

8oz plain flour
2 eggs
1 pint milk
pinch salt.

Once you've weighed out the flour, dry whisk it a few times with a balloon whisk.  Make a well in the centre and break the eggs into it.  Pour in the milk and then carefully whisk with the balloon whisk, drawing more flour into the well gradually.

Leave it to settle for half an hour or so and then go for it.

My favourite is banana-mars bar-chocolate spread.  But of course the first one is always lemon and sugar: sugar on first and then soaked with lemon juice.  ~Yum.

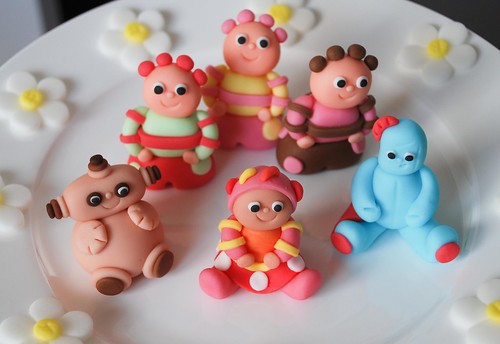
In the Night Garden Cake

Yes, another novelty cake. I'm on a bit of a mission to show people that it isn't that hard to make a cake that's impressive looking! Although if anyone's got any tips of photographing cakes I'd love to hear them as I just don't seem to be able to get them to look good on film, as it were.


I'm going to take this opportunity to talk about the type of cake you have inside all that icing.  For most of my novelty cakes I use a simple Madiera recipe because it is easy to carve, you can freeze it, and you can colour it.  However I'm not a huge fan of how it tastes so whenever possible I try and use something else.  My favourites are carrot cake and chocolate courgette cake, which I know sound rank when you think too much about it, but they are actually lovely.

For this cake I wanted something quite tall, as I wanted to decorate the sides.  The problem with stacking up cakes is that if you go with a standard sponge recipe you end up trying to cut them to make them flatter or fit together better.  So here I will give you a recipe for a chocolate cake that gives you a lovely tall, flat-topped cake with no carving.  What could be better.


This recipe makes 3 cakes to stack on top of each other, and comes from the Practical Encyclopedia of Baking by Martha Day which I highly recommend. I've had it for years and it has some excellent fail-safe recipes in and lots of pictures.

----------------------------------------------------------------------------------------------
Best-Ever Chocolate Sandwich

4oz unsalted butter
4oz plain flour
2 oz cocoa powder
1tsp baking powder
pinch salt
6 eggs
8oz caster sugar
2tsp vanilla extract

Preheat the oven to Gas /350degF/180degC. Line the base of three 20cm sandwich tins with greaseproof paper, grease and dust with flour.
Melt the butter.
Sift the flour, cocoa and baking powder together three times.
Place the eggs and sugar in a large heatproof bowl and set over a pan of hot water.  Use an electric mixer to beat until the mixture doubles in volume and is thick enough to leave a ribbon train when you lift the beaters out.  It takes about 10-12 minutes. Then whisk in the vanilla.
Sift in the dry ingredients in three batches, folding carefully in.
Fold in the melted butter.
Divide the mixture evenly between the tins.  If you find it hard to judge this, use a cocktail stick to measure how thick each one is and adjust accordingly.
Bake until the sides of the cake pull away from the sides of the tin.  About 25 minutes.
Turn them out as soon as you can onto a rack.
----------------------------------------------------------------------------------------------
I've mentioned before how much I hate regal icing.  The fact is it's really easy to make 3D models of things with it though, and for some reason the kids will gobble it up, so for now I use butter icing as much as possible and regal icing as little as possible. I this case I used chocolate butter icing for in-between the sandwiches and maple syrup butter icing for the outside (coloured green).  Maple syrup butter icing is SO GOOD on carrot cake, by the way.

If you are making characters or 3D things to go on top of a cake it's best to do them in advance and let them sit around for a few days to harden up.  Otherwise they will sag and get fatter and fatter.  If you are sticking them on top of a cake I advise using a cocktail stick to keep them secure. So these In the Night Garden characters were copied from here.  You can see they are caricatures of the originals and instantly recognisable but much easier to model.  It's just play-dough people.  I used Wilton colours again, as they are the best in my opinion.  In each case make the tummy, then the legs, then the head and finally the arms. Stick all the bits together using a paintbrush and water.  They need to harden up lying down for a couple of days.


The flowers on the outside were made using regal icing and these cutters from Lakeland.  I really like these type of cutters and they have a spring mechanism to push the cutting out.

Finally, I've piped some flowers on in yellow butter icing.  This masks the bottom of the cake where it joins the board.  I also went a bit mad on the top of the cake because I like piping.  It's fun!

...and that's the whole point really.  Making these things is good fun.  Don't let yourself get stressed out by it, just try and enjoy it.  I made the figures while watching TV during the week before, and put the cake together in a couple of hours the night before the party.  Go on, have a go and enjoy it!


Friday, February 08, 2013

Honey and Lemon

Ok it's Friday afternoon and I'm struggling.  I've been ill for a couple of weeks and you know what?  It's honey and lemon o'clock.


The simplest recipe in the world but it really does the world of good.  Juice of a lemon or two, a big spoon-full of honey (I prefer the set sort) and fill her up with boiling water.

Lidl certainly has its downsides, but their blossom honey is one of the things that I pick up without fail on my once-a-month trip to the next town.

Thursday, February 07, 2013

Eat This! - Swirly Biscuits

We needed to make some biscuits at quite short notice, and with kids these are the easiest thing in the world, and very satisfying.  You don't need to use cutters (hooray!) and they can play with the dough like playdough.


I feel I should apologise for the rather hideous plate, but as I said these biscuits were for a purpose which shall be revealed in a later post.

3 ingredients:

2oz caster sugar
4oz butter
6oz plain flour.

Couldn't be simpler.

On a side note, I don't spread butter on my bread, but I often need it for cooking (but not often enough to keep it in the fridge).  I keep it in the freezer but then this raises the problem of remembering to get it out in time to warm up before baking time.  Except it doesn't. If you grate frozen butter it warms up super quick and is ready to use in no time. If you aren't using a food processor for the recipe, just use the microwave, no-one wants to grate frozen butter by hand!


OK, cream butter and sugar and mix in flour.  Divide the dough into an appropriate number of balls and let each child choose a colour.  If they're old enough (mine aren't) let them loose with the food colouring.  I highly recommend gel food colourings rather than the liquid ones. You get a much better result and they don't make the dough/icing/whatever too soggy. Wilton do some nice ones which are available in cake decorating shops, Hobbycraft etc. Once the dough is all coloured, squish each ball into a pancake and then pile them up on top of each other.  We did double the recipe here and made two piles with different order of colours to make two kinds of biscuit.


The best idea here is to put a sheet of clingfilm underneath and then one of top.  This makes is easy to roll out and very easy to move it round the table so everyone has a go.


If I'd have thought about it beforehand, I'd have tidied up the kitchen for the photoshoot.  You take us as you find us.

Once it's rolled out (not too thin, somewhere between 5 and 10 mm) you need to roll it into a sausage.  It's pretty hard to take photos of the process when you have 3 kids having fun!


Cover the sausage in clingfilm and put it in the freezer for 10 mins or so until it is solid.
Then the fun bit.  Slice the sausage up (about 5 mm thick) and reveal the swirl!


Bake at gas mark 4 or 5 for 10-15 minutes.

Honestly these are serious fun. I wish all biscuits looked like this!


Sunday, February 03, 2013

Eat This! - Snow Eggs

My friend Jodi from Little Fishes playgroup told me about these and I said I'd try it and blog.  So here we are...

A new (to me) way with eggs. I've called them snow eggs, but I don't know what the proper name is.  If you do them with duck eggs they are called fluffy ducks apparently.

So the first step is to separate the eggs and whisk the whites up to soft peaks. Now come on, don't say that's going to take forever, it takes a minute at most with an electric whisk. Then take a slice of toast (I put a bit of marmite on mine) and put a couple of spoons of the egg white on the toast.  Make a well in the middle and pour the yolk in. I accidentally popped the yolk when I was seperating it, but it didn't matter.


Then put the rest of the egg white on the top, and top with cheese.


10 mins at gas mark 4 and there you have it, crispy and fluffy and then beautiful soft yolk.


Tuesday, January 29, 2013

Eat This! - Lamingtons

I didn't make Lamingtons this year (which I usually do on Australia Day) but I did see that they have bit to UK mainstream by being included in the new Guardian Cook section that comes with Saturday's paper.  I'm guessing every family has their own Lamington recipe, so just to wade in I'll give you ours.  Oh my, I love these things.  Mum used to make big piles of them for my birthday cake, and it seems the novelty of our family recipe is the use of a bit of lemon in the icing.


For the cake (you can use any sponge really, and it's great with slightly stale cake as it holds together better)

125g butter
3/4 cup caster sugar
2 eggs
2 cups self raising flour
1/2 cup milk
1 tsp vanilla

Cream butter and sugar and beat in the eggs.  Fold in the flour alternately with the milk (+ vanilla)

THIS MIXTURE WILL BE VERY THICK, DON'T WORRY!!!!

Bake at 180 degrees for 30 - 40 minutes until a skewer inserted into the middle comes out clean.

When the cake is cold cut into chunks of whatever size you fancy.

For the icing:

3 table spoons boiling water
2 table spoons cocoa
30g butter
2 cup icing sugar
lemon juice to taste

Melt the butter and stir in the cocoa powder. Stir in the icing sugar and add boiling water as necessary. Keep the icing warm as it will solidify quickly when cold!  Add lemon to taste.

NOW THE MESSY PART!  Dip the cake into the icing and then roll in coconut.  I always end up making more icing as it gets so messy and I end up using more than the recipe.  The coconut coated icing will dry almost immediately, so do the dipping while the icing is still hot. I guarantee you will be coated in icing and coconut by the end of this.

Yum.

Friday, January 14, 2011

Eat this!...Banana muffins

Man these were good. Asda was selling off bananas for 20p per kilo so what could I do but buy stacks and stacks. Much banana related cookery resulted but these really were the star of the show. Made a couple of dozen and froze them. They are fantastic straight out the freezer and into the microwave. Yum.
9 oz plain flour
1tsp baking powder
1 tsp bicarb
1 tsp cinnamon
1/2 tsp nutmeg
3 large bananas
1 egg
2 1/2 oz brown sugar
50 mL vegetable oil
as many raisins as you like.
Mash the bananas and beat in the egg, sugar and oil. Add the dry ingredients and beat in gradually. Add the raisins. 3/4 fill muffin cases and bake at gas 5 for 20-25 mins.

Saturday, September 04, 2010

Eat This - Green Tomato Chutney

I eat so much of my Mother-in-Law's green tomato chutney I though this year I would actually make some of my own. I never knew before that the inside of green tomatoes is almost exactly the colour of Spring.
I actually enjoyed all the chopping which I decided to do by hand rather than with the food processor as I couldn't be bothered with the washing up. I rarely get that much time to do something so dull so it was a nice change! I prepped all the veg last night and then left it all to soak in vinegar till this morning. Let me tell you that making chutney is not an activity to undertake in the morning when you are pregnant. The stench was almost unbearable when combined with morning sickness.
Four hours hellish simmering later and I had my marvellous chutney though. I won't be able to tell you how it tastes until next year though, it needs a good three months to mature!
Here's the recipe I used:
Green Tomato Chutney (makes about 8 lb)
2.5 lb green tomatoes
2.5 lb cooking apples, peeled and cored
2 lb onions
6 large cloves garlic, crushed
1 lb raisins
1 lb 6 oz brown sugar
1 oz pickling spice
1/2 tbs cayenne pepper
1/2 tbs salt
2 tbs ground ginger
3 pints malt vinegar

Chop everything up nice and small and put it all in a big preserving pan. Wrap the pickling spice in muslin and tie the parcel to the handle of the pan so it can freely sit in the middle of the mixture. Pour in the vinegar and bring to the boil. Simmer for 3.5 hours or so, stirring occasionally and more frequently towards the end. Once the liquid has reduced significantly and the mixture thickened nicely pour into hot sterile jars and seal immediately. Leave for 3 months to mature.

Friday, May 28, 2010

Eat This! - Flapjacks

Flapjacks, flapjacks, how marvellous you are. Actually for some time I thought flapjacks were rather inferior, but D was spending money buying them on his way home from work and I thought 'I bet I can make better ones than those'. It took a bit of experimentation to get the timing right but now we have a lovely squidgey texture and it is full of fruit so definitely should feature as one of your 5 a day. So here is my recipe (it is adapted from a recipe in The Dairy Book of Home Cookery: new edition for the 90s, which is fabulous for this sort of thing)...
100g butter
75g golden syrup
75g brown sugar
225g oats
2 bananas
large handfull of chopped apricots
large handfull of sultanas
handfull of desicated coconut
large chocolate bar
Put butter, syrup, mashed bananas and sugar in a bowl and melt together in the microwave (2 mins or so)
Combine dry ingredients and add sugary goodness to them. Mix well
Spread into a greased lined microwave-safe receptacle.
Cook in the microwave for 2.5 minutes. Stand for 1 minute then cook for another 2 minutes. Squish down the mixture with a spoon.
And now my favourite bit. Break the chocolate into pieces and put them on top of the flapjacks. Leave for 5-10mins then give them a swirl.

This will then take ages to set. Far longer than you will be able to wait to taste them so be prepared for a gooey mess.

Friday, March 26, 2010

Experiments in Recrystallisation 2 - Success?

I may have achieved success! So here's the method for making delicious delightful tablet that will help weight loss as part of a calorie-controlled diet.
1) Prepare!
100 g butter, 1 kg granulated sugar, 1 cup milk, 1 tin condensed milk
butter the tin well
get a plate, a glass of cold water, and a teaspoon.
2) Begin!
Put all the ingredients into a LARGE pan (do not use a non-stick pan). The mixture will more than double in volume when it starts boiling, so make sure it is big enough, for goodness sake. The idea is that the milk just damps down the sugar, so don't put too much in. I found just under 1 cup of milk to be enough to dissolve the sugar, but not too much to boil off.
Heat the mixture on a medium heat until everything is dissolved. Take a little of the mixture out and put it on the plate to keep track of the starting colour. Stir regularly. If you get bits of brown coming off the bottom reduce the heat and keep stirring, if you get black good luck cleaning the burned sugar off the pan.
Once it boils you can stop stirring all the time, but do it every so often. It won't stick to the pan unless the pan is too hot. Periodically check the colour and smell of the mix. At some point it will suddenly stop smelling of hot butter (yuk!) and start smelling of tablet (yum!). This is the point to stop! To check take a small teaspoon of mix and plunge it into cold water. If you can push your finger into it and it retains its shape then it is ready. It takes about 15-18 minutes to get to this stage.
Take it off the heat and stir like crazy. As soon as you feel crystallisation (slight thickening on the bottom of the pan), STOP and pour it into the tin.
This is where it went weird. I think I boiled it too long and the solution was far too saturated. As I poured it into the tin it boiled over! Anyway I squished it down again and the result is perfect!
Lovely shatter.